How to Save Brown-Tipped Plants

When leaf tips on your favorite plants turn brown, it's easy to blame diseases or insect pests. But the real problem behind most brown-tip troubles is improper care — as tough as that is to accept. Whether the problem happens with your indoor or outdoor plants, choosing the wrong remedy can send plants into tailspins and make things worse. Take time to identify and correct the real problems, and you can put brown-tipped plants back on track.
- Investigate what's happening underground
- Examine your soil and drainage
- Take a close look at roots
- Scout for fertilizer residue or salt buildup
- Keep recovering plants on track
- Get rid of brown leaf tips
Why Plant Leaf Tips Turn Brown
Plants naturally take water in and lose water through their leaves and other tissues every day. Leaf tips turn brown when something interferes with lost water being replaced. The way Mother Nature designed it, water flows from plant roots through stems and branches until it finally reaches leaf tips last. But when water's limited and other plant parts get served first, tips lose out and die from a kind of drought.
Anything that inhibits roots from absorbing enough water — or supplying it to your plant fast enough — can lead to unsightly brown tips. This includes giving your plant too much water, too little water or too much fertilizer. Root damage or distress also prevents roots from doing their job.
The specifics can differ between protected indoor plants and plants exposed outdoors, but brown tips happen for the same basic reasons in both. As sad as it is, brown tips are dead tips. You can't revive dead leaf cells, but you can make corrections and save the rest of your plant.
Troubleshooting Brown Leaf Tips
Even though brown leaf tips look dry and thirsty, don't believe it! Water may be the last thing your plant needs. A little botanical detective work helps get to the root of the real problem. Just take the following steps:
What's going on inside your pot? Look and see!
Investigate what's happening underground
Actually seeing what's causing roots to struggle can speed up your diagnosis and significantly improve its accuracy. This is easier with your indoor potted plants than with in-ground plants in your yard, but there's no substitute for an up-close, personal look below the soil line.
Coax brown-tipped houseplants out of their pots by turning them on their side and gently working the plant out of its pot. Most plants come out easily. If yours sticks, gently work it loose. Don't worry about hurting your plant; professional nursery growers do this all the time.
For landscape plants, don't dig up the plant. Focus on the area instead. Start with a spot between the plant's main stem or trunk and the outer edge of its branches, where rain drips from the leaf canopy down to the ground. Then dig a hole 6 to 12 inches deep to get a good peek at what's happening in soil. For larger plants, dig more than one hole to see if problems look widespread.
Examine your soil and drainage
Tucked inside your home or exposed outdoors, the soil around plants should generally be cool and moist to your touch. Unless you're growing aquatic plants, plants should never sit in water. Roots need air. In soggy soil, drowning roots shut down and rot, and new roots can't form. Minus healthy roots to absorb and transport water, plant tips turn brown from thirst.
When you pull a houseplant out of its pot, the soil should hold its shape. If it's dripping wet, check for blocked drainage holes and make sure water can run through freely. If holes are fine and operator error is to blame — i.e., you're overwatering — forgive yourself and move on. Reassess your watering schedule and promise your plants you'll do better next time.
If houseplant soil falls apart or holds a hard, dry shape, water probably can't reach roots. Overly dry soil can form a hard crust or pull away from your pot's sides. When that happens, water just runs down the sides and misses its mark. Break up any crust and press the soil back against the pot's side, then the whole root ball gets wet when you water.
The same principles apply to plants in your yard. If your soil is soaking wet everywhere around your plant, either you overwatered or you have poor drainage. If your soil is hard, crusty or extra dry, you haven't watered enough or your soil drains too fast.
For indoor and outdoor gardens, Pennington Full Season Potting Mix revitalizes soil with essential plant nutrients and makes your soil better than before. This premium garden mix contains bio-stimulants to improve plant nutrient uptake, earthworm castings to enhance soil nutrients and sustainably sourced peat to help maintain moisture balance.
Pennington Full Season Potting Mix, also designed especially for containers, combines the same Earth-friendly ingredients plus water-holding crystals and a wetting agent to help stabilize soil moisture, improve water penetration and make the most of the water you use.
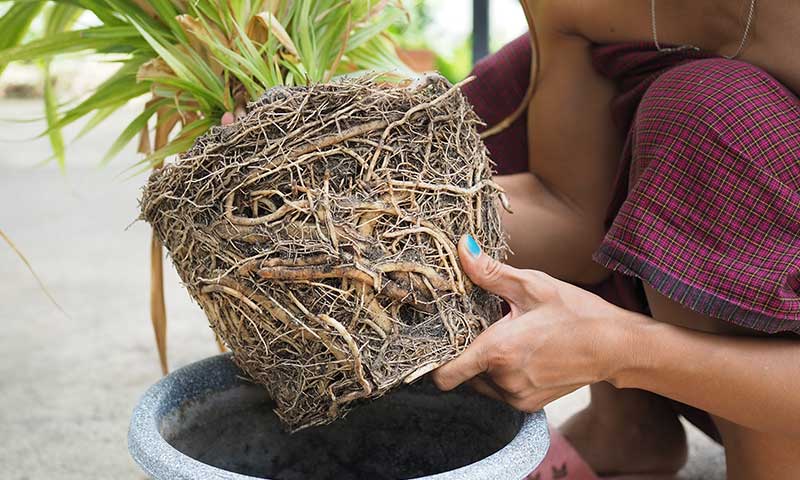
Circling, binding roots keep leaf tips from getting water they need.
Take a close look at roots
Roots provide clues to their health and the health of their environment. Healthy roots, with a few colorful exceptions, are white and firm with a fresh, soil-like smell. Gray or brown roots are usually dead or dying from too much water — and the diseases that soggy soil invites — and they smell like rot. If roots are black, they're really far gone.
Once roots rot, you can't bring them back. New roots need to take over. In houseplants, remove the old soil, prune away rotting roots, and repot with Pennington Rejuvenate Premium All-Purpose Potting Soil Mix. You can do the same with small outdoor garden plants, but don't try to tackle large landscape trees and shrubs by yourself. You may need professional help.
Roots that wind back or circle around themselves also signal trouble for plants, indoors or out. This happens a lot when plants outgrow their containers or pots weren't large enough at planting time.
Roots on potted plants should grow out to where the soil meets the pot, but never wrap or circle around much inside. If pots become bound in roots, remaining soil can't hold enough water to meet the need. Repot root-bound plants into larger containers, but gently loosen the roots with your hand first. This way, roots can grow out into the new soil.
Landscape plants usually aren't bothered with binding roots, unless the problem was there at planting time or your soil prevents normal, natural growth. Soil testing and lab-recommended amendments keep this problem out of your yard.
Scout for fertilizer residue or salt buildup
Plant tips can turn brown when they get too much fertilizer and too many salts build up in the soil. When this happens to potted plants, tips turn brown from what's called fertilizer burn or tip burn. In landscape plants, the same thing can happen with too much fertilizer, winter deicing salts or pet urine. The salty buildup draws moisture away from plant roots and creates an artificial drought. Then — you guessed it — water-deprived plant tips turn brown.
At Pennington, we've reimagined plant food with fertilizers that blend organic and natural ingredients that work with nature, harmoniously. Used as directed, our Pennington Rejuvenate plant foods won't burn plants. From our all-purpose plant fertilizer to our special tomato and veggie food, your plants get revitalizing nutrients, plus humic acids, earthworm castings and beneficial microorganisms that help strengthen plants against stress and drought.
In houseplants, salt buildup shows up as white crust on soil or saucers and on the sides of porous pots. Flushing the soil with heavy doses of water forces salts out and restores normal balance around roots. Just sit the pot in the sink or shower, and water it until the soil is soaked and water runs through. Repeat the process several times to flush the soil thoroughly. Make sure to dump excess water from the saucer when you're through.
If landscape plants get exposed to over-fertilizing, road salts or heavy pet use, don't wait for leaf tips to turn brown. Get proactive. Water plants heavily and repeatedly to flush built-up salts out the soil and prevent tip burn. If plants start to show brown tips as soil thaws in spring, salts may have hit during winter months. Flush the soil through heavy watering before tips get worse.
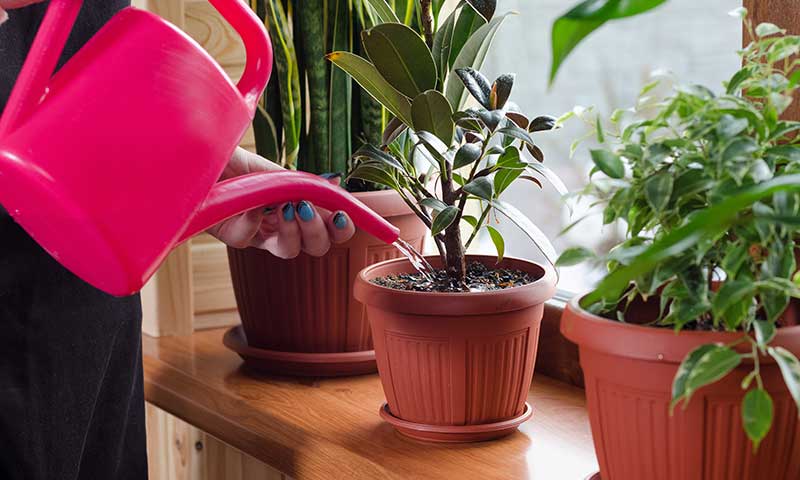
Get your watering right and avoid most brown tip problems.
Keep recovering plants on track
With your plants back on the path to good health, adjust your care — especially watering — to keep them headed in the right direction. Never water automatically, whether plants are potted or in the ground. Always test the soil first, with an index finer or a moisture meter. If it feels wet at finger-length depth, wait a few days and check again. If soil feels dry, it's time to water. If you use tap water to water your indoor plants, let water sit overnight. This reduces fluoride and other substances that can add to brown tips.
Most plants stay healthiest when watered deeply and infrequently, in your home and your landscape. Water houseplants so all the soil is moist, then let them dry slightly before you water again. If the humidity in your home is very low, a pebble-filled saucer at the plant's base can help keep tips and moisture in balance.
During active growth periods, most outdoor plants need the equivalent of at least one inch of rainfall each week, from either you or Mother Nature. When watering, this equals about 5 gallons of water per square yard. Most roots, even on large landscape trees, stay in the top 6 to 12 inches of soil. One inch of water seeps down to that depth in most soils. That keeps healthy roots supplied with water and leaf tips well-hydrated.
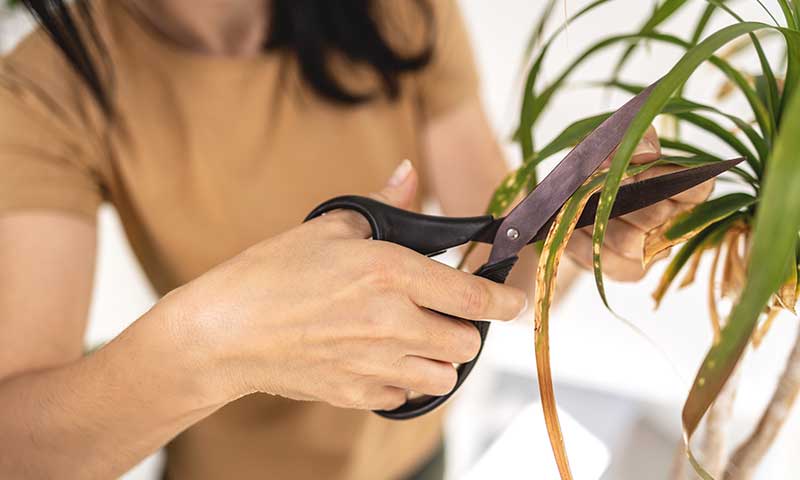
Don't trim tips straight across. Follow the natural leaf shape instead.
Get rid of brown leaf tips
With your care on track and plants headed for better times, you don't need brown tips to remind you of what went wrong. Most outdoor plants take care of the problem when they drop their leaves in fall, but potted indoor plants can use a hand getting rid of the evidence.
Take a cue from professional interiorscapers — the people who care for indoor plants in offices and malls — and put brown tips in your past. Use sharp scissors to cut away the dead, brown areas. Just be sure to follow the leaf's natural shape. You'll still have a thin brown line along the cut, but the rest of the leaf will stay green, and your secret will be safe.
At Pennington, we've been making yard and garden dreams come true — one plant, one person, one yard, one home at a time — since 1945. We get it. We understand that every leaf matters, right down to the tip. Have a question or a dream to share? We'd love to hear it and stay in touch. Let us help you nurture your roots.
Always read product labels thoroughly and follow instructions.


